Работа с Google Cloud Platform (compute instance template) и Terraform в Unix/Linux
Google Cloud Platrorm — это платформа вида «инфраструктура как сервис» (IaaS), позволяющая клиентам создавать, тестировать и развертывать собственные приложения на инфраструктуре Google, в высокопроизводительных виртуальных машинах.
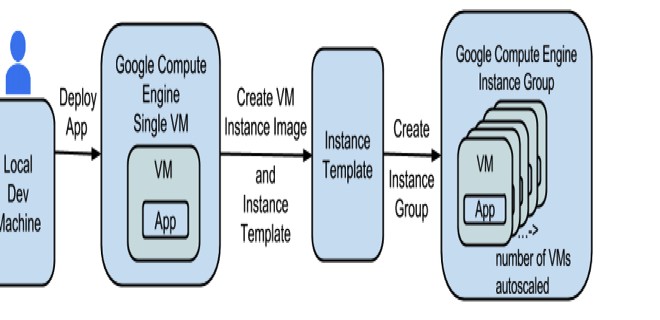
Google Compute Engine предоставляет виртуальные машины, работающие в инновационных центрах обработки данных Google и всемирной сети.
Compute instance template — это API ресурс, который можно использовать для создания экземпляров виртуальной машины и групп управляемых экземпляров. Шаблоны экземпляров определяют тип машины, образ загрузочного диска или изображение контейнера, зону, метки и другие свойства экземпляра. Затем вы можете использовать шаблон экземпляра для создания группы управляемых экземпляров или для создания отдельных экземпляров виртуальной машины. Шаблоны экземпляров — это удобный способ сохранения конфигурации экземпляра виртуальной машины, поэтому вы можете использовать ее позже для создания новых экземпляров виртуальной машины или групп экземпляров VM.
Установка terraform в Unix/Linux
Установка крайне примитивная и я описал как это можно сделать тут:
Установка terraform в Unix/Linux
Вот еще полезные статьи по GCP + Terrafrom:
Работа с Google Cloud Platform (compute instance) и Terraform в Unix/Linux
Работа с Google Cloud Platform (compute health check) и Terraform в Unix/Linux
Работа с Google Cloud Platform (compute target pool) и Terraform в Unix/Linux
Работа с Google Cloud Platform (compute forwarding rule) и Terraform в Unix/Linux
Работа с Google Cloud Platform (compute firewall) и Terraform в Unix/Linux
Работа с Google Cloud Platform (compute disk) и Terraform в Unix/Linux
Работа с Google Cloud Platform (compute image) и Terraform в Unix/Linux
Так же, в данной статье, я создал скрипт для автоматической установки данного ПО. Он был протестирован на CentOS 6/7, Debian 8 и на Mac OS X. Все работает должным образом!
Чтобы получить помощь по использованию команд, выполните:
$ terraform --help
Usage: terraform [--version] [--help] <command> [args]

The available commands for execution are listed below.
The most common, useful commands are shown first, followed by
less common or more advanced commands. If you're just getting
started with Terraform, stick with the common commands. For the
other commands, please read the help and docs before usage.

Common commands:
    apply              Builds or changes infrastructure
    console            Interactive console for Terraform interpolations
    destroy            Destroy Terraform-managed infrastructure
    env                Workspace management
    fmt                Rewrites config files to canonical format
    get                Download and install modules for the configuration
    graph              Create a visual graph of Terraform resources
    import             Import existing infrastructure into Terraform
    init               Initialize a Terraform working directory
    output             Read an output from a state file
    plan               Generate and show an execution plan
    providers          Prints a tree of the providers used in the configuration
    push               Upload this Terraform module to Atlas to run
    refresh            Update local state file against real resources
    show               Inspect Terraform state or plan
    taint              Manually mark a resource for recreation
    untaint            Manually unmark a resource as tainted
    validate           Validates the Terraform files
    version            Prints the Terraform version
    workspace          Workspace management

All other commands:
    debug              Debug output management (experimental)
    force-unlock       Manually unlock the terraform state
    state              Advanced state management
Приступим к использованию!
Работа с Google Cloud Platform (compute instance template) и Terraform в Unix/Linux
Первое что нужно сделать — это настроить «Cloud Identity». С помощью сервиса Google Cloud Identity вы сможете предоставлять доменам, пользователям и аккаунтам в организации доступ к ресурсам Cloud, а также централизованно управлять пользователями и группами через консоль администратора Google.
Полезное чтиво:
Установка Google Cloud SDK/gcloud в Unix/Linux
У меня есть папка terraform, в ней у меня будут лежать провайдеры с которыми я буду работать. Т.к в этом примере я буду использовать google_cloud_platform, то создам данную папку и перейду в нее. Далее, в этой папке, стоит создать:
$ mkdir examples modules
В папке examples, я буду хранить так званые «плейбуки» для разварачивания различных служб, например — zabbix-server, grafana, web-серверы и так далее. В modules директории, я буду хранить все необходимые модули.
Начнем писать модуль, но для этой задачи, я создам папку:
$ mkdir modules/compute_instance_template
Переходим в нее:
$ cd modules/compute_instance_template
Открываем файл:
$ vim compute_instance_template.tf
В данный файл, вставляем:
#---------------------------------------------------
# Create compute instance template
#---------------------------------------------------
resource "google_compute_instance_template" "compute_instance_template" {

    name                    = "${length(var.name) > 0 ? "${lower(var.name)}-template-${lower(var.environment)}" : "" }"
    #name_prefix             = ""
    description             = "${var.description}"

    project                 = "${var.project}"
    region                  = "${var.region}"

    machine_type            = "${var.machine_type}"
    instance_description    = "${var.instance_description}"
    min_cpu_platform        = "${var.min_cpu_platform}"
    can_ip_forward          = "${var.can_ip_forward}"

    metadata {
        ssh-keys = "${var.ssh_user}:${file("${var.public_key_path}")}"
    }

    metadata_startup_script = "${file("${path.module}/${var.install_script_src_path}")}"


    network_interface {
        network             = "${var.subnetwork == "" ? var.network : ""}"
        subnetwork          = "${var.subnetwork}"
        subnetwork_project  = "${var.subnetwork_project}"
        address             = "${var.address}"

        alias_ip_range {
            ip_cidr_range              = "${var.alias_ip_range_ip_cidr_range}"
            subnetwork_range_name      = "${var.alias_ip_range_subnetwork_range_name}"
        }

        access_config {
            nat_ip                  = "${var.nat_ip}"
            network_tier            = "${var.network_tier}"
        }
    }

    disk {
        auto_delete     = "${var.disk_auto_delete}"
        boot            = "${var.disk_boot}"
        device_name     = "${var.disk_device_name}"
        disk_name       = "${var.disk_disk_name}"
        source_image    = "${var.disk_source_image}"
        interface       = "${var.disk_interface}"
        mode            = "${var.disk_mode}"
        source          = "${var.disk_source}"
        disk_type       = "${var.disk_disk_type}"
        disk_size_gb    = "${var.disk_disk_size_gb}"
        type            = "${var.disk_type}"
    }

    service_account {
        email   = "${var.service_account_email}"
        scopes  = "${var.service_account_scopes}"
    }

    scheduling {
        preemptible         = "${var.scheduling_preemptible}"
        on_host_maintenance = "${var.scheduling_on_host_maintenance}"
        automatic_restart   = "${var.scheduling_automatic_restart}"
    }

    guest_accelerator {
        type    = "${var.guest_accelerator_type}"
        count   = "${var.guest_accelerator_count}"
    }

    tags = [
        "${lower(var.name)}",
        "${lower(var.environment)}",
        "${lower(var.orchestration)}"
    ]

    labels {
        name            = "${lower(var.name)}-template-${lower(var.environment)}"
        environment     = "${lower(var.environment)}"
        orchestration   = "${lower(var.orchestration)}"
    }

    lifecycle {
        ignore_changes = [
            "network_interface",
        ]
        create_before_destroy = true
    }

}
Открываем файл:
$ vim variables.tf
И прописываем:
variable "name" {
    description = "A unique name for the resource, required by GCE. Changing this forces a new resource to be created."
    default     = "TEST"
}

variable "region" {
  description = "An instance template is a global resource that is not bound to a zone or a region. However, you can still specify some regional resources in an instance template, which restricts the template to the region where that resource resides. For example, a custom subnetwork resource is tied to a specific region. Defaults to the region of the Provider if no value is given."
  default     = ""
}

variable "project" {
    description = "The ID of the project in which the resource belongs. If it is not provided, the provider project is used."
    default     = ""
}

variable "environment" {
    description = "Environment for service"
    default     = "STAGE"
}

variable "orchestration" {
    description = "Type of orchestration"
    default     = "Terraform"
}

variable "createdby" {
    description = "Created by"
    default     = "Vitaliy Natarov"
}

variable "name_prefix" {
    description = "Creates a unique name beginning with the specified prefix. Conflicts with name."
    default     = "template-"
}

variable "can_ip_forward" {
    description = "Whether to allow sending and receiving of packets with non-matching source or destination IPs. This defaults to false."
    default     = false
}

variable "description" {
    description = "A brief description of this resource."
    default     = ""
}

variable "instance_description" {
    description = "A brief description to use for instances created from this template."
    default     = ""
}

variable "ssh_user" {
    description = "User for connection to google machine"
    default     = "captain"
}

variable "public_key_path" {
    description = "Path to file containing public key"
    default     = "~/.ssh/gcloud_id_rsa.pub"
}

variable "install_script_src_path" {
    description = "Path to install script within this repository"
    default     = "scripts/install.sh"
}

variable "network" {
    description = "The name or self_link of the network to attach this interface to. Either network or subnetwork must be provided."
    default     = "default"
}

variable "subnetwork" {
    description = "The name or self_link of the subnetwork to attach this interface to. The subnetwork must exist in the same region this instance will be created in. Either network or subnetwork must be provided."
    default     = ""
}

variable "subnetwork_project" {
    description = "The project in which the subnetwork belongs. If the subnetwork is a self_link, this field is ignored in favor of the project defined in the subnetwork self_link. If the subnetwork is a name and this field is not provided, the provider project is used."
    default     = ""
}

variable "address" {
    description = "The private IP address to assign to the instance. If empty, the address will be automatically assigned."
    default     = ""
}

variable "nat_ip" {
    description = "The IP address that will be 1:1 mapped to the instance's network ip. If not given, one will be generated."
    default     = ""
}

variable "network_tier" {
    description = "The networking tier used for configuring this instance. This field can take the following values: PREMIUM or STANDARD. If this field is not specified, it is assumed to be PREMIUM."
    default     = "PREMIUM"
}

variable "service_account_email" {
    description = "The service account e-mail address. If not given, the default Google Compute Engine service account is used. Note: allow_stopping_for_update must be set to true in order to update this field."
    default     = ""
}

variable "service_account_scopes" {
    description = "A list of service scopes. Both OAuth2 URLs and gcloud short names are supported. To allow full access to all Cloud APIs, use the cloud-platform scope. Note: allow_stopping_for_update must be set to true in order to update this field."
    default     = []
}

variable "scheduling_preemptible" {
    description = "Is the instance preemptible."
    default     = "false"
}

variable "scheduling_on_host_maintenance" {
    description = "Describes maintenance behavior for the instance. Can be MIGRATE or TERMINATE"
    default     = "TERMINATE"
}

variable "scheduling_automatic_restart" {
    description = "Specifies if the instance should be restarted if it was terminated by Compute Engine (not a user)."
    default     = "true"
}

variable "guest_accelerator_type" {
    description = "The accelerator type resource to expose to this instance. E.g. nvidia-tesla-k80."
    default     = ""
}

variable "guest_accelerator_count" {
    description = "The number of the guest accelerator cards exposed to this instance."
    default     = "0"
}

variable "min_cpu_platform" {
    description = "Specifies a minimum CPU platform for the VM instance. Applicable values are the friendly names of CPU platforms, such as Intel Haswell or Intel Skylake. Note: allow_stopping_for_update must be set to true in order to update this field."
    default     = "Intel Haswell"
}

variable "machine_type" {
    description = "The machine type to create.To create a machine with a custom type (such as extended memory), format the value like custom-VCPUS-MEM_IN_MB like custom-6-20480 for 6 vCPU and 20GB of RAM."
    default     = "n1-highcpu-4"
}

variable "alias_ip_range_ip_cidr_range" {
    description = "The IP CIDR range represented by this alias IP range. This IP CIDR range must belong to the specified subnetwork and cannot contain IP addresses reserved by system or used by other network interfaces. At the time of writing only a netmask (e.g. /24) may be supplied, with a CIDR format resulting in an API error."
    default     = "/24"
}

variable "alias_ip_range_subnetwork_range_name" {
    description = "The subnetwork secondary range name specifying the secondary range from which to allocate the IP CIDR range for this alias IP range. If left unspecified, the primary range of the subnetwork will be used."
    default     = ""
}

variable "disk_auto_delete" {
    description = "Whether or not the disk should be auto-deleted. This defaults to true."
    default     = "true"
}

variable "disk_boot" {
    description = "Indicates that this is a boot disk."
    default     = true
}

variable "disk_device_name" {
    description = "A unique device name that is reflected into the /dev/ tree of a Linux operating system running within the instance. If not specified, the server chooses a default device name to apply to this disk."
    default     = ""
}

variable "disk_disk_name" {
    description = "Name of the disk. When not provided, this defaults to the name of the instance."
    default     = ""
}

variable "disk_source_image" {
    description = "The image from which to initialize this disk. This can be one of: the image's self_link, projects/{project}/global/images/{image}, projects/{project}/global/images/family/{family}, global/images/{image}, global/images/family/{family}, family/{family}, {project}/{family}, {project}/{image}, {family}, or {image}."
    default     = ""
}

variable "disk_interface" {
    description = "Specifies the disk interface to use for attaching this disk."
    default     = ""
}

variable "disk_mode" {
    description = "The mode in which to attach this disk, either READ_WRITE or READ_ONLY. If you are attaching or creating a boot disk, this must read-write mode."
    default     = "READ_WRITE"
}

variable "disk_source" {
    description = "The name of the disk (such as those managed by google_compute_disk) to attach."
    default     = ""
}

variable "disk_disk_type" {
    description = "The GCE disk type. Can be either 'pd-ssd', 'local-ssd', or 'pd-standard'."
    default     = "pd-standard"
}

variable "disk_disk_size_gb" {
    description = "The size of the image in gigabytes. If not specified, it will inherit the size of its base image."
    default     = "10"
}

variable "disk_type" {
    description = "The type of GCE disk, can be either 'SCRATCH' or 'PERSISTENT'."
    default     = "PERSISTENT"
}
Собственно в этом файле храняться все переменные. Спасибо кэп!
Открываем последний файл:
$ vim outputs.tf
И в него вставить нужно следующие строки:
output "name" {
    description = "Name of compute instance template"
    value       = "${google_compute_instance_template.compute_instance_template.*.name}"
}

output "self_link" {
    description = "self_link"
    value       = "${google_compute_instance_template.compute_instance_template.*.self_link}"
}
Переходим теперь в папку google_cloud_platform/examples и создадим еще одну папку для проверки написанного чуда:
$ mkdir compute_instance_template && cd $_
Внутри созданной папки открываем файл:
$ vim main.tf
Вставляем:
#
# MAINTAINER Vitaliy Natarov "vitaliy.natarov@yahoo.com"
#
terraform {
  required_version = "> 0.9.0"
}
provider "google" {
    credentials = "${file("/Users/captain/.config/gcloud/creds/terraform_creds.json")}"
    project     = "terraform-2018"
    region      = "us-east1"
}
module "compute_instance_template" {
    source                              = "../../modules/compute_instance_template"
    name                                = "TEST"

    #Create a new boot disk from an image
    disk_source_image                   = "centos-7"
    disk_auto_delete                    = true
    disk_boot                           = true

    #Use an existing disk resource
    #disk_source_image                   = "foo_existing_disk"
    #disk_auto_delete                    = false
    #disk_boot                           = false

    service_account_scopes              = ["userinfo-email", "compute-ro", "storage-ro"]
}
Все уже написано и готово к использованию. Ну что, начнем тестирование. В папке с вашим плейбуком, выполняем:
$ terraform init
Этим действием я инициализирую проект. Затем, подтягиваю модуль:
$ terraform get
PS: Для обновление изменений в самом модуле, можно выполнять:
$ terraform get -update
Проверим валидацию:
$ terraform validate
Запускем прогон:
$ terraform plan
Мне вывело что все у меня хорошо и можно запускать деплой:
$ terraform apply
Как видно с вывода, — все прошло гладко! Чтобы удалить созданное творение, можно выполнить:
$ terraform destroy
Весь материал аплоаджу в github аккаунт для удобства использования:
$ git clone https://github.com/SebastianUA/terraform.git
Вот и все на этом. Данная статья «Работа с Google Cloud Platform (compute instance template) и Terraform в Unix/Linux» завершена.